
IBM Cloud Pak for Integration V2020.2 on Azure – Part 2
In this blog series, we are going to install the 60 days evaluation version of OpenShift Container Platform (OCP)4.4.x on Azure with IBM Cloud Pak for Integration 2020. The evaluation version of OpenShift is fully functional and you are able to convert it later into a fully supported version once you have acquired the appropriate Red Hat subscription.
In Part one of the series, we made sure that all the OpenShift 4 pre-requisites were in place before we began the OpenShift installation in Azure. In this blog, we are going to install OpenShift 4. In the final blog of the series, we will install IBM Cloud Pak for Integration. You may also follow the steps in this blog if you plan on installing other IBM Cloud Paks.
PREREQUISITES
- You must install the cluster from a computer that uses Linux or macOS.
- You need 500 MB of local disk space to download the installation program.
DOWNLOADING OPENSHIFT 4.4.12 INSTALLER AND PULL SECRET
STEP 1
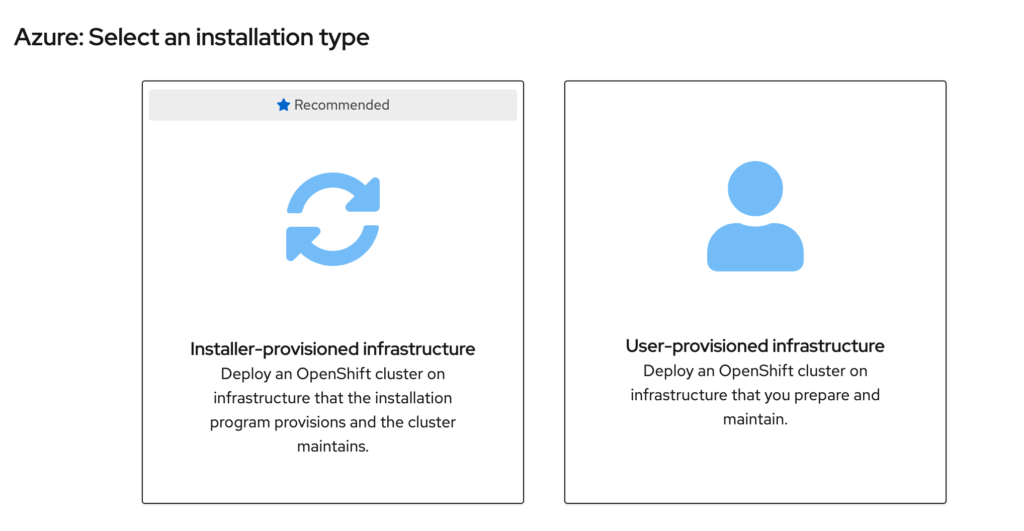
Open the OCP 4 from the Red Hat Evaluation website.
STEP 2
Choose the Azure OpenShift tile and follow the instructions accordingly.
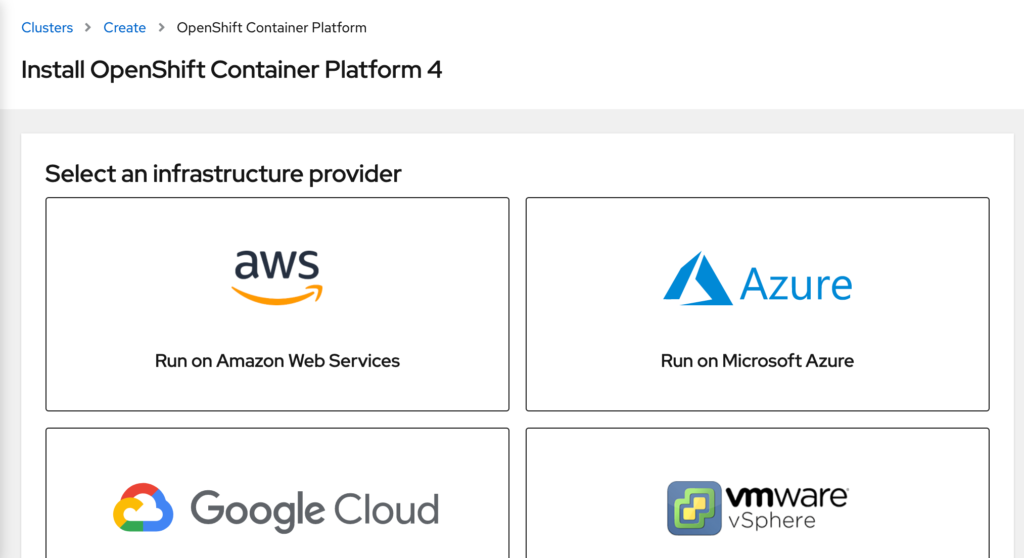
STEP 3
Select the Installer-provisioned infrastructure (IPI) tile. The IPI installer deploys the Openshift cluster with the necessary load balancer, DNS configuration, and storage in Azure.
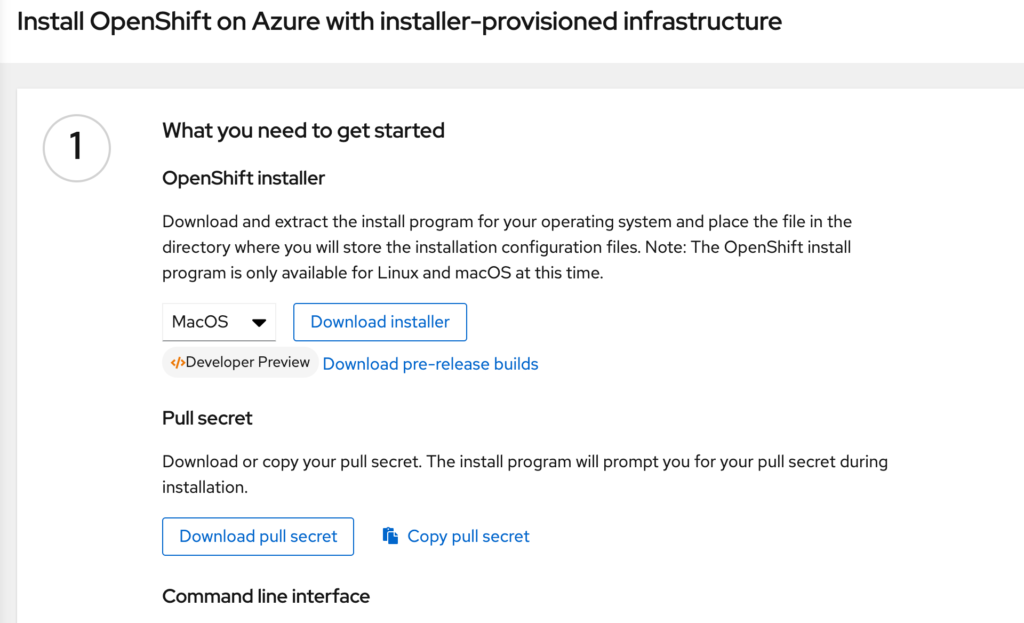
STEP 4
Download the pull secret from Step 1 of the instruction.
- Get the Pull secret as it contains your login credentials.
- DO NOT download the installer nor the Openshift CLI offered by the evaluation links as they may not be supported by CP4I 2020.2.1. The supported OpenShift version (OCP 4.4.12) is provided in the links below.
STEP 5
Place all the above binaries in a new directory. The (installer) directory should contain:
- oc
- kubectl
- openshift-install
- pull-secret.txt
STEP 6
Verify the openshift-install version is 4.4.12

BEFORE YOU BEGIN THE DEPLOYMENT
You need to configure the following pre-requisites.
A) (Optional) A SSH private key for access to the installed nodes in order to perform installation debugging or disaster recovery on your cluster. You can use an existing user (workstation) ssh key if you are troubleshooting from that workstation or create a new key;
B) Ensure there is internet access from the cluster to download the OCP images from quay.io;
C) Install jq (download from here);
D) Create a new service principal for OpenShift and grant permissions to the service principal (see below).
GET YOUR AZURE ACCOUNT DETAILS
Obtain your Azure account details required for the install.
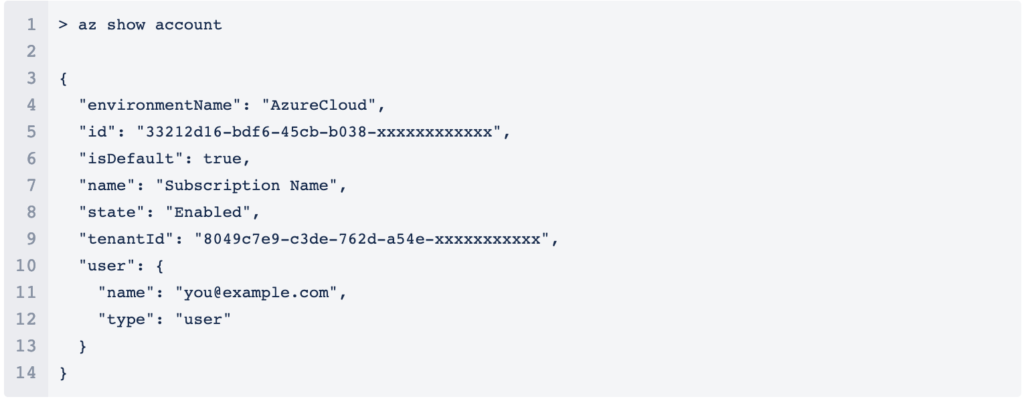
STEP 1
Login to Azure and list the account subscriptions.
![]()
Azure lists all your account subscriptions.
STEP 2
Get account subscription id.
Make sure you have selected the correct subscription. Record the tenantId and (Subscription) id from the output.
If required, change the subscription to set the correct subscription id.
![]()
STEP 3
Create a service principal for the OpenShift cluster.
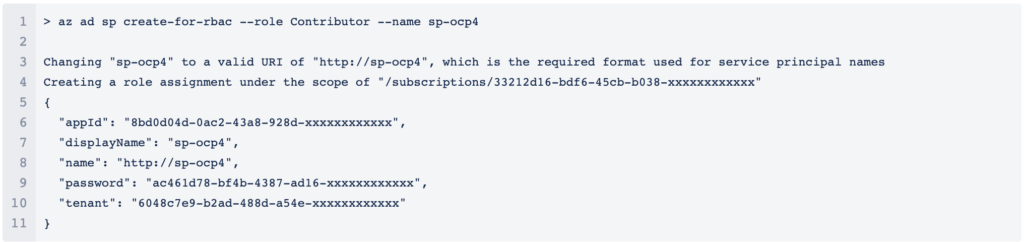
Example. Service principal = sp-ocp4
Record the appId and password from the output. These values are required during the OpenShift Container Platform installation.
Verify the Service Principal (id is http://sp-ocp4)
![]()
STEP 4
Grant additional permissions to the service principal.
A) Assign the User Access Administrator role where <appId> = 8bd0d04d-0ac2-43a8-928d-xxxxxxxxxxxxi

B) Assign the Azure Active Directory Graph permission where <appId> = 8bd0d04d-0ac2-43a8-928d-xxxxxxxxxxxx

C) Approve the permissions request where <appId> = 8bd0d04d-0ac2-43a8-928d-xxxxxxxxxxxx

PREPARING FOR THE CP4I INSTALLATION
The default Azure OpenShift cluster created by the IPI installer has 3 master and 3 worker nodes.

The worker nodes are under spec and do not meet the minimum requirements for IBM Cloud Pak Common Services. You can find out about the CP4I Common Service system requirements here.
There are two ways to prepare the cluster for the Cloud Pak installation.
1) Customise the OpenShift cluster install configuration prior to the deployment (in Part 3 of the series).
2) Create and deploy a new OpenShift MachineSet with the correct specification post cluster deployment.
We are going with option 2, to deploy a new MachineSet in this blog.
DEPLOY THE CLUSTER
The create cluster command requires an installation_directory. It is relative to the current install directory. The example uses install01 as the installation directory.
The install directory is where the installer stores all the artifacts generated to create the cluster. Do not delete this directory post cluster creation. The cluster UUID (in metadata.json) and metadata, stored in the directory, are referenced when deleting the cluster. It removes the cluster registration in Red Hat OpenShift Cluster Manager (here).
For the pull secret prompt, cut and paste the downloaded pull secret string from (4).
The install starts immediately once you have provided the pull secret. Be patient, it may be several minutes before you’ll see the first status output from the installer.
Time for a coffee or tea break…
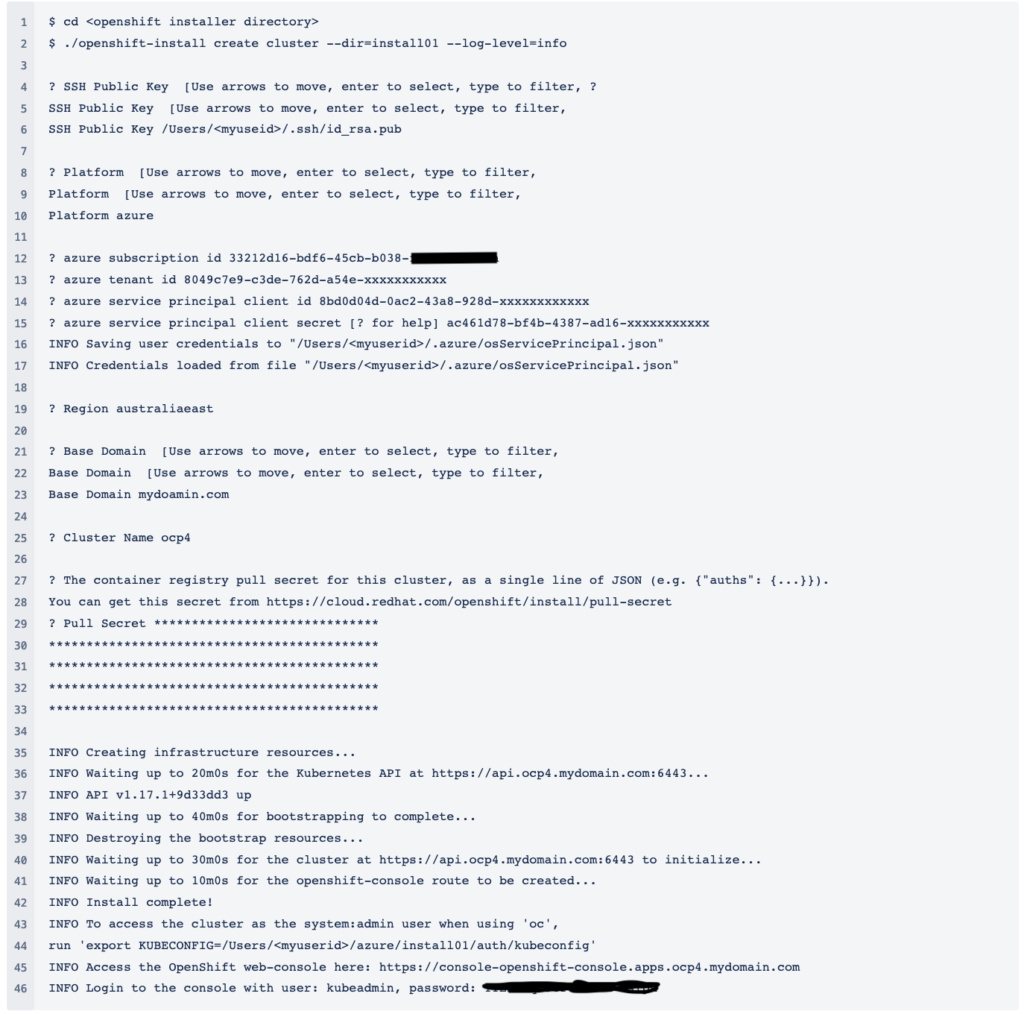
AFTER ABOUT 60 MINUTES
You have a running OpenShift cluster running on Azure. The entire cluster and all the complementary resources created as part of the IPI install are grouped in an OCP generated Azure resource group to ease management and cost tracking.
Log in to the Azure Portal. The Installer has created a new resource group, under the subscription id that houses all the resources associated with the cluster. Your nominated DNS zone has been updated to include new records for the cluster.
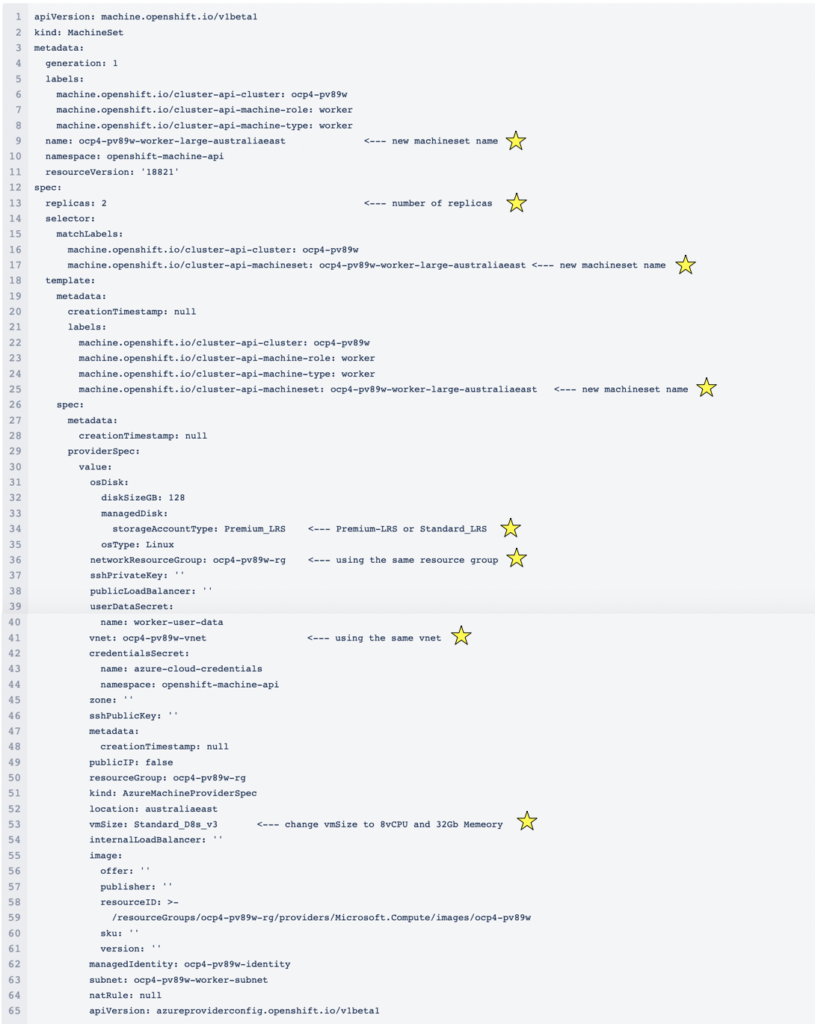
DEPLOYING A NEW MACHINESET
A new machine set is required because the default workers do not meet the server spec required from CP4I. We need a new set of workers that meet the requirement VPCs and memory. The easiest way to create a new MachineSet is to use the existing worker node MachineSet as a template. An alternative, to avoid the provisioning of new workers, is to customise the default workers configuration prior to creating the cluster. Below, we show you what to update to add two new workers of VM Size Standard_D8s_v3 with 128 Gb storage.
STEP 1
Get the current machineset from OpenShift.

STEP 2
Edit the ms-large.yaml file to contain the alternate configurations highlighted.
STEP 3
Apply the changes made.
![]()
IMPORTANT INFORMATION
The RHCOS Ignition config files that the installation program generates contains certificates that expire after 24 hours. You must keep the cluster running for 24 hours, in a non-degraded state, to ensure that the first certificate rotation has finished.
You must not delete the installation program or the files that the installation program creates (ie files in ./install01/ in this case). Both are required to delete the cluster.
UNINSTALL THE CLUSTER
To remove the cluster, execute the following command from the install directory instead of deleting the resource group from Azure. The installer requires the metadata.json stored in the installation directory to deregister the cluster on Red Hat OpenShift Cluster Manager. The installer will reverse out all the changes made in Azure including the DNS records.
![]()
NEXT STEPS
We are now ready to install IBM Cloud Pak for Integration. See you in Part 3.
REFERENCES
CHECK THE LINKS AFTER THE BLOGS ARE READY
- Running IBM Cloud Park for Integration 2020.2 on Azure – Part One
- Running IBM Cloud Park for Integration 2020.2 on Azure – Part Three
- Running IBM Cloud Park for Integration 2020.2 on Azure – Part Four