
Create certificates with Subject Alternative Name fields on DataPower
INTRODUCTION
DataPower appliances are fantastic for implementing secure gateways to your systems, even apart from the gateway enforcement capability they provide for API Connect.
Implementing TLS server endpoints and client connections on DataPower requires certificates and private keys. Ideally, the keys should be generated on board the appliance and never exported. They can be protected from a disaster by maintaining an up to date Secure Backup, which includes the key and certificate files. Although keys could be generated outside the appliance and imported, this increases the potential for exposure. Each copy needs to be securely overwritten on disk, and it can be difficult to control exactly where disk copies of the key data might be made.
DataPower provides two main interfaces for creating keys and self-signed certificates or certificate signing requests (CSR).
- The Web GUI
- The CLI
The Web GUI is more conventient as the user can just fill in all the fields and click the button to generate a new key and certificate or CSR. The problem with the Web GUI for generating certificates is that it doesn’t provide any control of other fields in the certificate or CSR. A self-signed certificate is generated with CA:true for example, and there is no way when using the GUI to set Subject Alternative Name values, which are now the accepted way to assert end point addresses in certificates.
The CLI on the other hand has quite long command forms which can be inconvenient to type, and generating a certificate or CSR with extensions requires the use of an openSSL config file which has to be uploaded to the temporary: directory before the keygen command is run.
The capability of adding extensions to the certificate is documented in the manual under the information about the keygen command: https://www.ibm.com/support/knowledgecenter/SS9H2Y_10.0/com.ibm.dp.doc/keygen_crypto.html
However, the information provided is quite sparse. It says the file needs to be in openSSL config file format, and specifies that only certain sections of the file will be used.
I found that establishing a working config file that could be used to create a certificate was not a simple task.
CREATE THE CONFIG FILE FOR A CSR
The openSSL config file is a text file which needs to be created on your workstation or server, and uploaded into the temporary: directory on the appliance.
I found that the keygen command would fail unless an attributes section was provided, even though no attributes were needed or wanted. I created a dummy attribute in my config file, just to allow the keygen to work.
I also found that I needed to create references to the various sections in the [req] section, although this is not made clear in the manual.
The first example config file is called “syntegrity-web-site.cnf”. It is used to create a certificate signing request and private key. The CSR includes SAN values for several DNS names, an IP address (just to demonstrate how to add it) and an email address. The request also creates a self-signed certificate, which means that the required certificate object is created rather than us having to create it later when the signed certificate is uploaded. If you don’t want to create the self-signed certificate, remove the x509 extensions options and section from the config file, and remove the gen-sscert and export-sscert parameters from the keygen command.
[req]
req_extensions     = req_extensions
x509_extensions    = x509_extensions
attributes         = attributes
[req_extensions]
basicConstraints   = critical,CA:false
subjectAltName     = DNS:*.syntegrity.com.au,DNS:syntegrity.com.au,IP:1.2.3.4,email:sales@syntegrity.com.au
[x509_extensions]
basicConstraints   = critical,CA:false
subjectAltName     = DNS:*.syntegrity.com.au,DNS:syntegrity.com.au,IP:1.2.3.4,email:sales@syntegrity.com.au
[attributes]
ignore             = this
The file can be uploaded using the Web UI or a copy command on the CLI. It needs to be loaded into the temporary: directory.
Note: the [distinguished_name] section could be used to provide the DN values instead of providing them on the command line. An example of a config file (called syntegrity-web-site-with-dn.cnf) including the DN fields follows:
[req]
distinguished_name = req_distinguished_name
req_extensions     = req_extensions
x509_extensions    = x509_extensions
attributes         = attributes
[req_distinguished_name]
C                  = AU
ST                 = Victoria
L                  = Melbourne
O                  = Syntegrity Solutions
OU                 = TEST
CN                 = WebSite Certificate
[req_extensions]
basicConstraints   = critical,CA:false
subjectAltName     = DNS:*.syntegrity.com.au,DNS:syntegrity.com.au,IP:1.2.3.4,email:sales@syntegrity.com.au
[x509_extensions]
basicConstraints   = critical,CA:false
subjectAltName     = DNS:*.syntegrity.com.au,DNS:syntegrity.com.au,IP:1.2.3.4,email:sales@syntegrity.com.au
[attributes]
ignore             = this
GENERATE THE KEY AND CSR
To generate a CSR using the config file, the keygen command is run including the config-file parameter. If the parameters relating to the distinguished name are included on the command line, they must be before the config-file parameter. They can also be provided in a [distinguished_name] section in the config-file.
The following commands create a password alias and the key and CSR. The key, self-signed certificate and CSR are placed into the temporary: directory so that copies can be held outside DataPower. If you don’t need a copy of the private key, then you should leave off the export-key parameter.
When updating a password-map from the command line, the system will prompt to overwrite if a password-map already exists. Do NOT specify ‘y’ as it will destroy all existing password map entries. Specify ‘n’ so that your new entry will be added to the existing password-map.
top;configure terminal;crypto

password-map
  Alias-name: syntegrity-web-site
  Plaintext password: ************
  Re-enter plaintext password: ************

keygen C AU ST Victoria L Melbourne O "Syntegrity Solutions" OU TEST CN "WebSite Certificate" config-file syntegrity-web-site.cnf digest sha256 key-type RSA rsa 2048 object-name syntegrity-web-site gen-sscert gen-object file-name syntegrity-web-site password-alias syntegrity-web-site export-key export-sscert
Note: the DN was provided on the keygen command line, not in the [distinguished_name] section of the config-file paramter. The following example shows the command where the DN is obtained from a [distinguised_name] section instead.
keygen config-file syntegrity-web-site-with-dn.cnf digest sha256 key-type RSA rsa 2048 object-name syntegrity-web-site gen-sscert gen-object file-name syntegrity-web-site password-alias syntegrity-web-site export-key export-sscert
The output from the keygen command tells you what files have been created, and where you can download the them from.
keygen: Generating a 2048 bit RSA private key
keygen: This could take some time, please be patient
keygen: Saved private key in 'cert:///syntegrity-web-site-privkey.pem'
keygen: Saved private key in 'temporary:///syntegrity-web-site-privkey.pem' [INSECURE DIRECTORY]
keygen: Saved certificate signing request in 'temporary:///syntegrity-web-site.csr'
keygen: Saved self-signed certificate in 'cert:///syntegrity-web-site-sscert.pem'
keygen: Saved self-signed certificate in 'temporary:///syntegrity-web-site-sscert.pem'
The keygen command output doesn’t show the objects that have been created, but a key object and a certificate object, both called syntegrity-web-site have been created. The following shows output displaying information about these objects.
  idg(config-crypto)# show key syntegrity-web-site

  key: syntegrity-web-site [up] (new)
  ------------------------
   admin-state enabled
   file-name cert:///syntegrity-web-site-privkey.pem


  idg(config-crypto)# show certificate syntegrity-web-site

  certificate: syntegrity-web-site [up] (new)
  --------------------------------
   admin-state enabled
   file-name cert:///syntegrity-web-site-sscert.pem
   ignore-expiration off
You can now send the csr file to your Certificate Authority to be signed. You upload the certificate file which is returned (say syntegrity-web-site-cert.pem into the cert: directory. Then update the certificate object called syntegrity-web-site to reference the new CA signed certificate file instead of the original self-signed certificate file.
CREATE THE CONFIG FILE FOR A SELF-SIGNED CERTIFICATE
To create a self-signed certificate rather than a certificate signed request, the x509_extensions sections is used instead of the req_extensions section. The content may well be quite similar. As shown above, when using a single keygen command to create both a self-signed certificate and a CSR, both sections are needed.
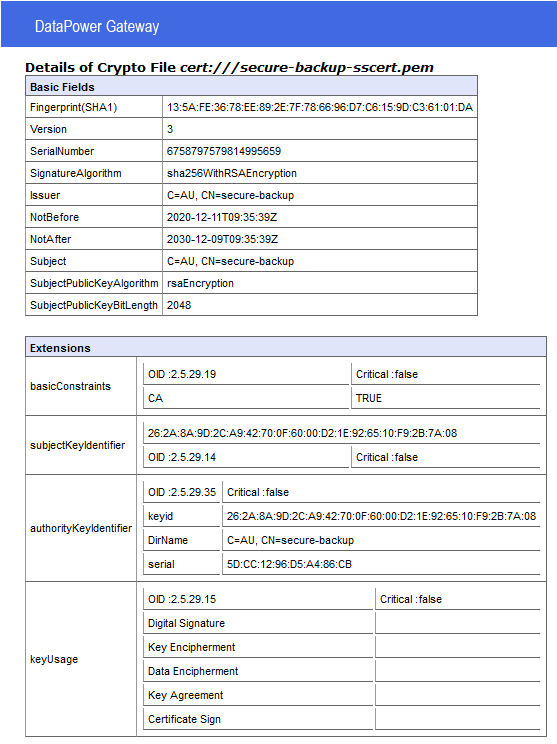
This example shows the creation of a certificate/key pair to be used for Secure Backup. There is no benefit in using a CA signed certificate for Secure Backup, so a self-signed certificate will be created. There is also no need for SAN fields, as the certificate will not be used to assert the identity of a web site. We could use the Web UI to create the certificate, but any self-signed certificate created by the Web UI has the CA basic constraint set to true. This should not be the case for the Secure Backup self-signed certificate, as it will not be used to sign other certificates. The settings is at best misleading, and at worst potentially dangerous since the private key must be exported. A compromised key could be used to sign other certificates. A small misconfiguration of trust could then lead to fraudulent certificates being accepted as valid.
The openSSL config file shown (secure-backup.cnf) sets the distinguished name and forces the CA value to false.
[req]
distinguished_name = distinguished_name
x509_extensions     = x509_extensions
attributes         = attributes
[distinguished_name]
C                  = AU
ST                 = Victoria
L                  = Melbourne
O                  = Syntegrity Solutions
OU                 = Test
CN                 = syntegrity secure-backup
[x509_extensions]
basicConstraints   = critical,CA:false
[attributes]
ignore             = this
Upload the config file into the temporary: directory.
GENERATE THE KEY AND SELF-SIGNED CERTIFICATE
The key pair can now be generated with the keygen command. For a key used by Secure Backup, the private key must be exported. This is because the key and certificate must be uploaded into the replacement appliance before a Secure Restore can be run. The password used to encrypt the private key must also be saved. A secure digital key safe is generally the best place to store these secure assets.
The CLI keygen command shown references the syntegrity-secure-backup.cnf file we created and uploaded, and specifies the object and file names for the command output. The password-map is created first so that the key will be encrypted when exported.
When updating a password-map from the command line, the system will prompt to overwrite if a password-map already exists. Do NOT specify ‘y’ as it will destroy all existing password map entries. Specify ‘n’ so that your new entry will be added to the existing password-map.
top;configure terminal;crypto

password-map
  A password-map already exists - overwrite? Yes/No [y/n]: n
  Appending to current password map...
  Alias-name: syntegrity-secure-backup
  Plaintext password: ************
  Re-enter plaintext password: ************

keygen config-file syntegrity-secure-backup.cnf digest sha256 key-type RSA rsa 2048 object-name syntegrity-secure-backup gen-sscert gen-object file-name syntegrity-secure-backup password-alias syntegrity-secure-backup export-key export-sscert
The output of the command includes both the self-signed certificate and a certificate signing request. The CSR file can be ignored. The certificate and key files must be downloaded and securely stored as they must be restored to a new appliance before Secure Restore can be run.
The output from the keygen command shows the files that were created.
keygen: Generating a 2048 bit RSA private key
keygen: This could take some time, please be patient
keygen: Saved private key in 'cert:///syntegrity-secure-backup-privkey.pem'
keygen: Saved private key in 'temporary:///syntegrity-secure-backup-privkey.pem' [INSECURE DIRECTORY]
keygen: Saved certificate signing request in 'temporary:///syntegrity-secure-backup.csr'
keygen: Saved self-signed certificate in 'cert:///syntegrity-secure-backup-sscert.pem'
keygen: Saved self-signed certificate in 'temporary:///syntegrity-secure-backup-sscert.pem'
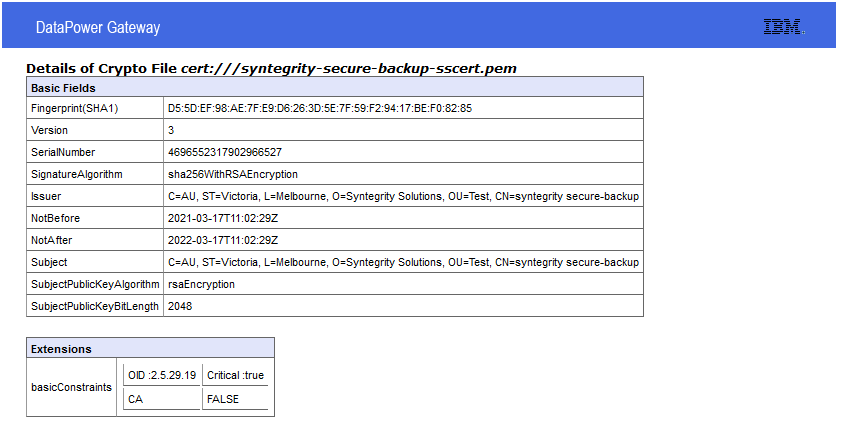
The certificate includes the basic constraints extension specifying that the certificate cannot be used as a Certificate Authority certificate.
It’s not possible to view the certificate details from the CLI, but you can view it from the Web UI and compare it with a certificate created using the Web UI Crypto Tools page.
The two illustrations below show the details of two certificates. First one created using the Web UI Crypto Tools, which has the CA:TRUE attribute, followed by a certificate created using the keygen command with the syntegrity-secure-backup.cnf config file.
Certificate created using Web UI
Certificate created using CLI and config-file
CONCLUSION
DataPower appliances do provide a mechanism to create certificates which include SAN and other extension properties, but they don’t make it easy. You have to create the config-file, upload it, and create the certificate using the CLI rather then Web UI Crypto Tools.
However, the benefit of improved certificate configuration and secure generation make it worth the effort in my view.
I hope this saves you some time next time you need to generate a certificate for your DataPower appliance.
The sample openSSL configuration files included in this blog are linked below:
- syntegrity-secure-backup-with-dn-in-config.cnf
- syntegrity-web-site.cnf
- syntegrity-web-site-with-dn.cnf