
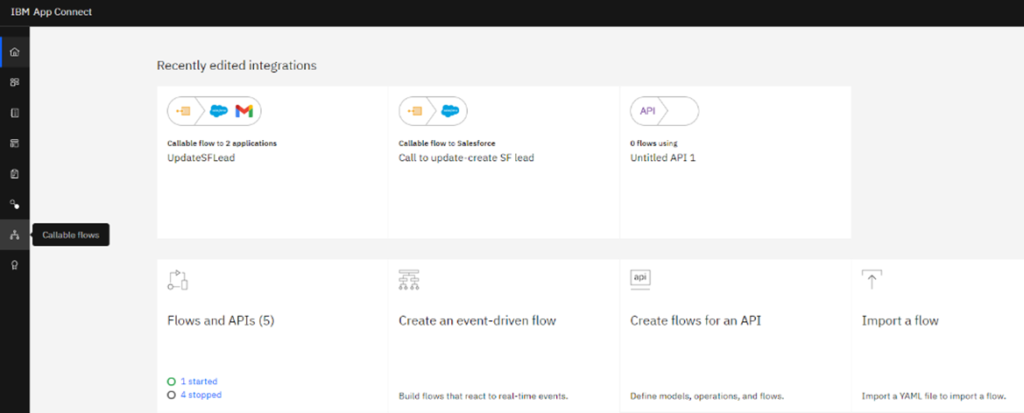
Hybrid integration with IBM App Connect Enterprise and App Connect Designer
This blog demonstrates the ease with which you can integrate cloud-native services with existing workload on-premises using IBM App Connect Designer (Designer) on IBM Cloud and IBM App Connect Enterprise (ACE) on-premises.
INTRODUCTION
The Designer is a browser-based, low-code integration tool suitable for business users to create integrations connected to software-as-a-service (SaaS) applications. The Designer is used to create flows quickly for APIs or event-driven flows for SaaS applications, including Salesforce and SAP.
With the Designer, you can call existing message flows developed in the ACE toolkit and running on an integration server on IBM Cloud Pak for Integration, on-premises or App Connect on IBM Cloud using callable flows.
This blog illustrates two scenarios for connecting on-premises ACE flow with App Connect Designer flow hosted on IBM Cloud. These integrations are known as ‘hybrid integration’. The two scenarios are described below:
- Scenario 1: An event-driven flow developed in the Designer calls a message flow deployed on a
local ACE integration server. - Scenario 2: A REST API deployed on a local ACE integration server calls a flow on the App
Connect on IBM Cloud.
In the content that follows the term, ‘on-premises’ is interchangeable with ‘local’.
PREREQUISITES
- A business or Developer Edition account of Salesforce.
- An IBM Cloud account with IBM App Connect service – Enterprise plan, Cloud Connector plan, or Lite plan (free).
- IBM App Connect Enterprise (ACE) v11 on your local machine.
- A functioning on-premises ACE integration server.
SCENARIO 1
This scenario shows how an on-cloud SaaS application can share data and processing with on-premises ACE callable flows. We are using an example in which a new lead on Salesforce must synchronise with an on-premises application running on an ACE integration server. The Designer is used to orchestrate the event-driven flow and call the local application and send out emails using the Gmail API.
HIGH-LEVEL SEQUENCE FOR IMPLEMENTING SCENARIO 1
- Set up the connection for callable flows between the Designer and ACE;
- Develop an event-driven flow in the Designer;
- Develop and deploy the on-premises callable flow on the integration server;
- Start the App Connect flow;
- Test the scenario.
DETAILED STEPS
STEP 1. SET UP THE CONNECTION FOR CALLABLE FLOWS BETWEEN THE DESIGNER AND ACE:
A one-time configuration is required to establish a hybrid connection between the Designer and the local integration server. Such configuration will involve communication between the on-cloud App Connect acting as the switch server and the local integration server as the connectivity agent. To complete the configuration, place an agentx.json file on the local integration server. The file is auto-generated when a switch server is created, and it contains the location and certificates required for connecting the integration server to the switch server.
- Sign in to IBM App Connect on IBM Cloud.
- On the dashboard, click Connect callable flows.
- Click on Download the configuration to download the agentx.json file.
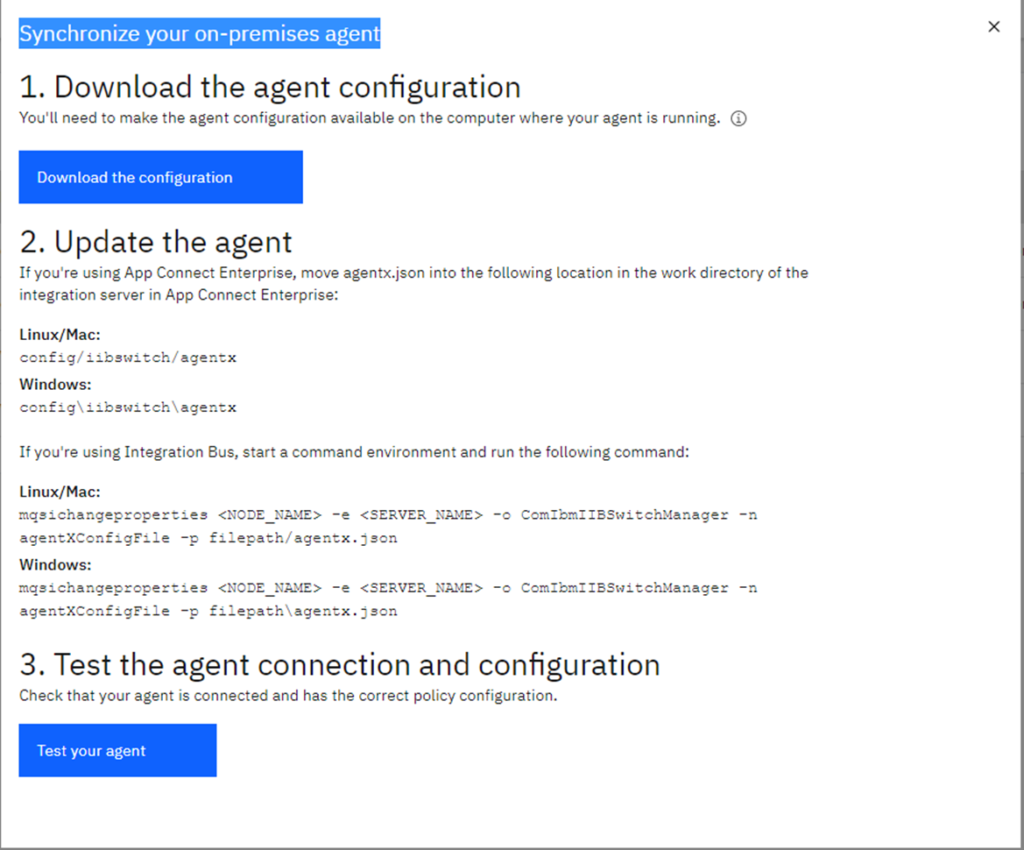
- Copy the agentx.json and place it under the ACE integration server’s working directory. For a local integration server the working directory is the ACE installation directory, in this instance
workingdir=C:\IBM\ACET11\myaceworkdir_POC\config\iibswitch. Place the agentx.json as below:
workingdir/config/iibswitch/agentx folder of the integration server. - Start the integration server:

- Click on Test your agent, and it should show that at least one agent is connected.
- This secure connection is established between the on-cloud App Connect and the local ACE integration server for callable flows.
STEP 2. DEVELOP AN EVENT-DRIVEN FLOW IN THE DESIGNER
The Designer’s flow is a simple event-driven flow that is triggered when a new lead is added in Salesforce. This flow invokes the on-premises callable flow to pass on the lead details. The Designer flow later updates the status of the lead in Salesforce. A success or failure email is sent based on the response of the Salesforce update.
- Add the Salesforce connector with a new lead on the canvas. You will need to login into your Salesforce account and provide authorisation details. Refer to Salesforce_connect_cloud for more details on how to connect:
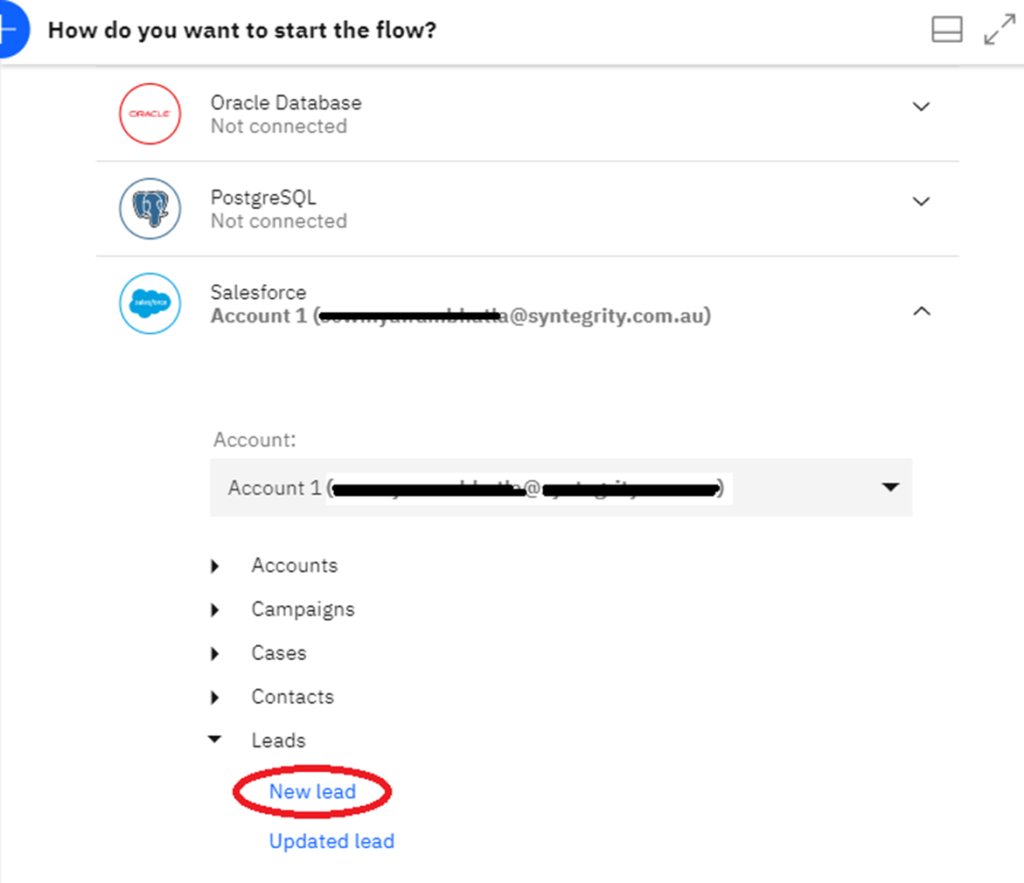
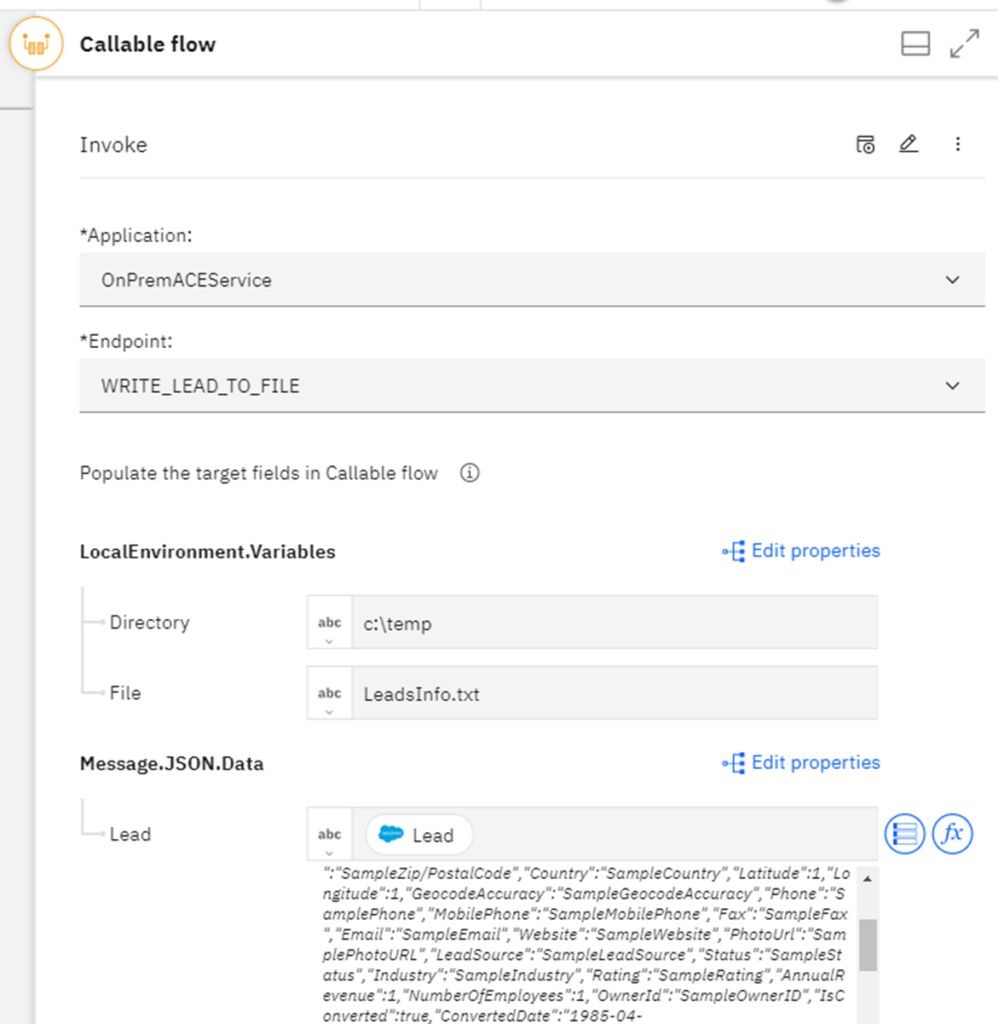
- Drag the Callable Flows to the canvas and configure it to call the on-premises callable flow. This connector can pass variables from Salesforce to the local application.
a. The drop-down options for Application and Endpoint fields for Callable Flow -Invoke, are available only after a callable flow is deployed on the integration server, covered in Step 3.2. and 3.3.
b. Configure the local variables to pass Directory (C:\temp) and File name (LeadInfo.txt) in this case. This can be done by click Edit properties. These variables will be available as LocalEnvironment variables for the on-premises message flow.
c. Click on Edit properties to add JSON object -Lead to Message.JSON.Data. This will be input message body for the on- premises message flow
3. Set the status of Salesforce connector to “Working-Contacted“:
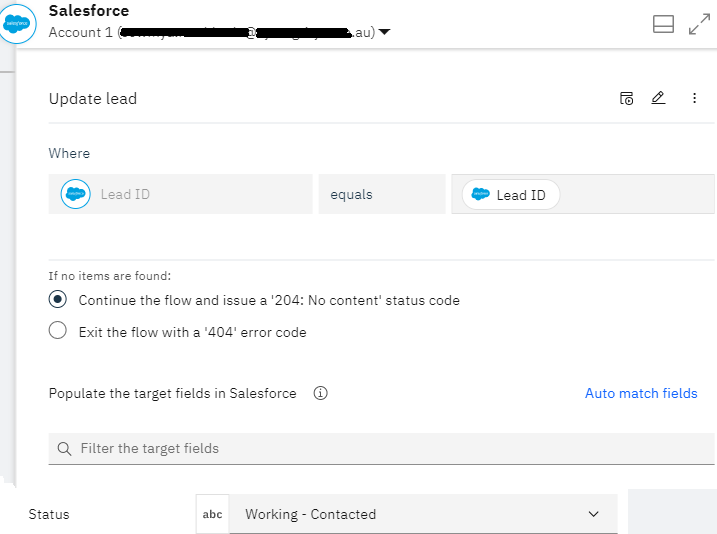
4. Add an ‘If’ connector to check the response from Salesforce. If the response code is 204 (success), send a success email using Gmail connector; otherwise, send a failure email. Refer to Gmail connector for details.
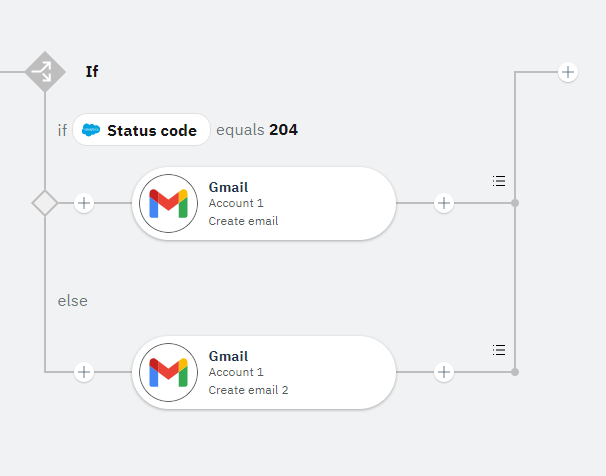
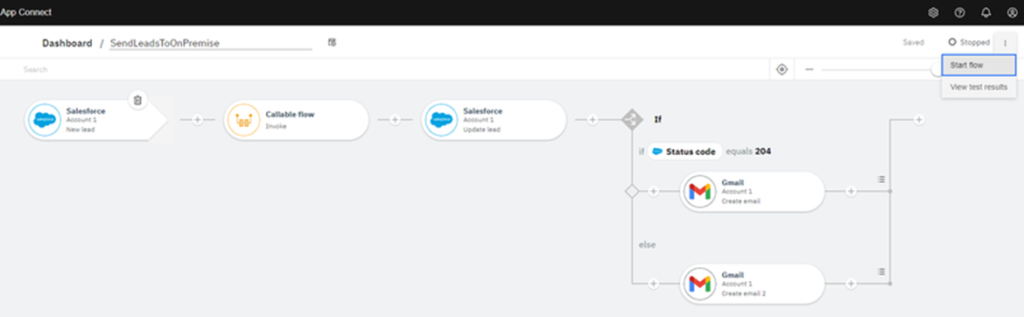
5. The complete flow is shown below:

STEP 3. DEVELOP AND DEPLOY THE ON-PREMISES CALLABLE FLOW ON THE INTEGRATION SERVER
- Develop a callable flow using the local ACE toolkit. The illustration below uses a simple use-case to show the working of a callable flow. The flow, when invoked, writes the lead information to a file and updates a status field. In a typical business use case, you may have an existing service that the App Connect flow can reuse. You are just adding a facade to make it “callable”.
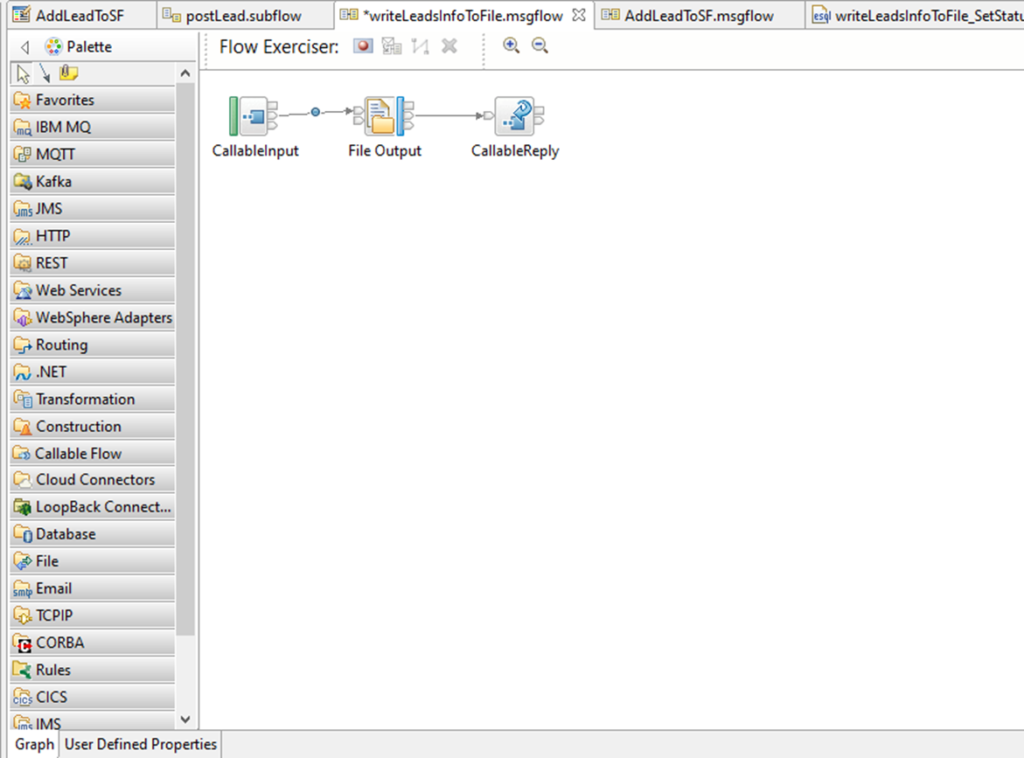
2. Set the Endpoint name for the CallableInput node. This name is used in the Callable Flow connector in the Designer.
3. Deploy the flow to the integration server.

4. Revisit Step 2.2 to select the callable flow and configure the variables if needed.
STEP 4. START THE APP CONNECT FLOW
- Go to the Dashboard and select the flow. Click Start flow on the top right corner.
- The flow starts and is ready for testing.
STEP 5. TEST THE SCENARIO
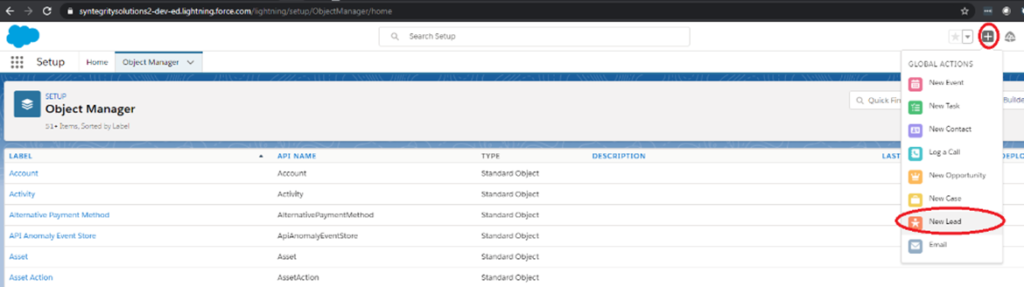
- Login to your Salesforce account and click on New lead:
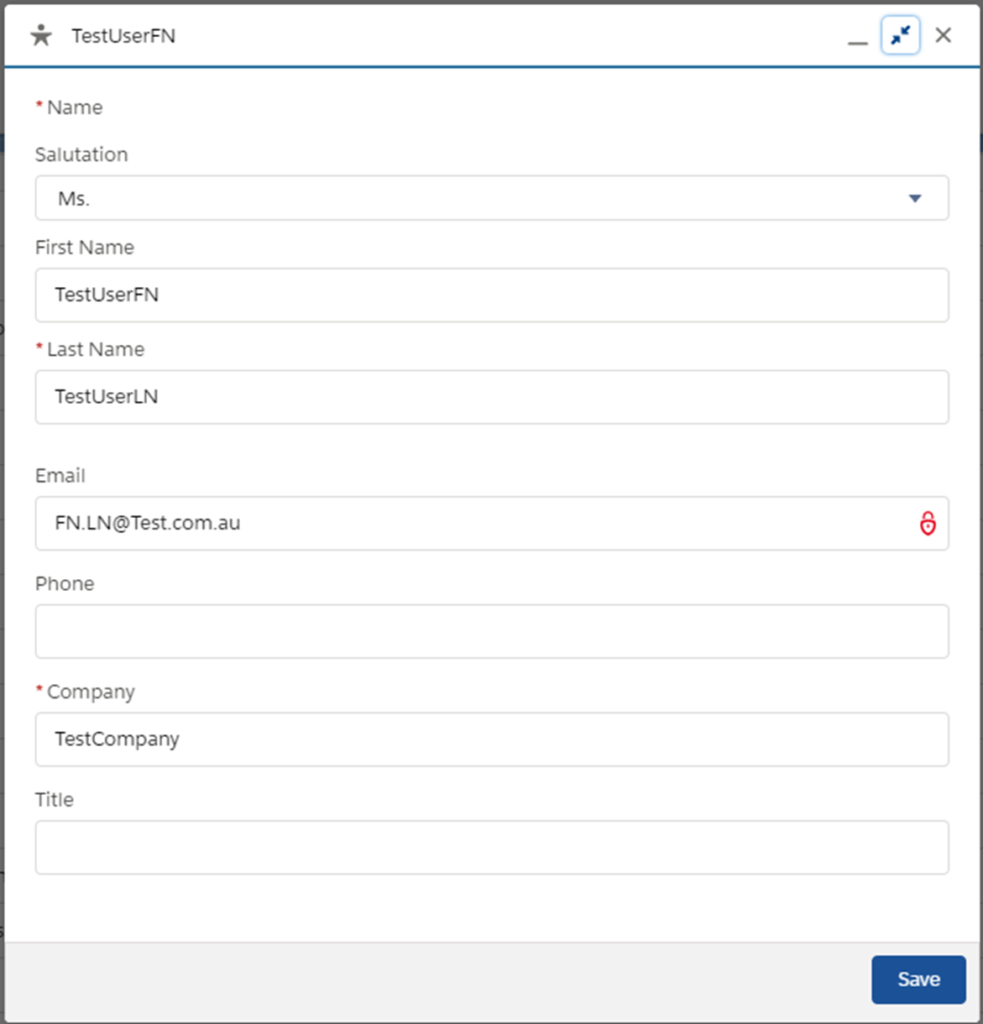
- Create a new lead and click save:
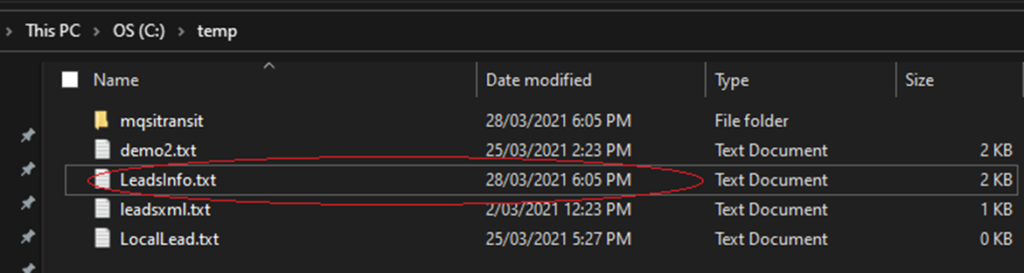
- A file with the new lead details is created under C:\temp.
- An email is also sent to the configured email id.

- The above scenario can be unit tested in App Connect Designer also using the Try this flow capability.

SCENARIO 2
This scenario describes how ACE updates on-premises enterprise data and calls an event-driven (Callable) flow on App Connect in IBM Cloud. The App Connect flow passes the data to the SaaS applications. In this scenario, when a new lead is added to the on-premises REST application flow, the lead details are passed to a flow running in App Connect. The App Connect flow updates or creates a Salesforce lead then sends an email to notify a Sales representative.
HIGH-LEVEL SEQUENCE FOR SCENARIO 2
- Set up connection for callable flows between the Designer and ACE;
- Develop an event-driven (Callable) flow in App Connect Designer;
- Develop and deploy the on-premises callable flow on an integration server;
- Start App Connect Flow;
- Test the scenario.
DETAILED STEPS
STEP 1. SET UP CONNECTION FOR CALLABLE FLOWS BETWEEN THE DESIGNER AND ACE
Please refer to scenario 1 if not already done. This is a one-time activity.
STEP 2. DEVELOP AND DEPLOY THE ON-PREMISES FLOW ON AN INTEGRATION SERVER
This service is a simple REST API implemented via ACE toolkit and deployed on an integration server. The REST API allows the new lead to be added to the local application (simulated using a FileOutput node). It synchronizes this new lead with Salesforce via the App Connect on Cloud flow using the Callable Flow Invoke node. After the successful lead creation, an email is sent.
- The application AddLeadToSF has a POST method with a resource called “lead“. For more details on how to create a click REST API in ACE toolkit.
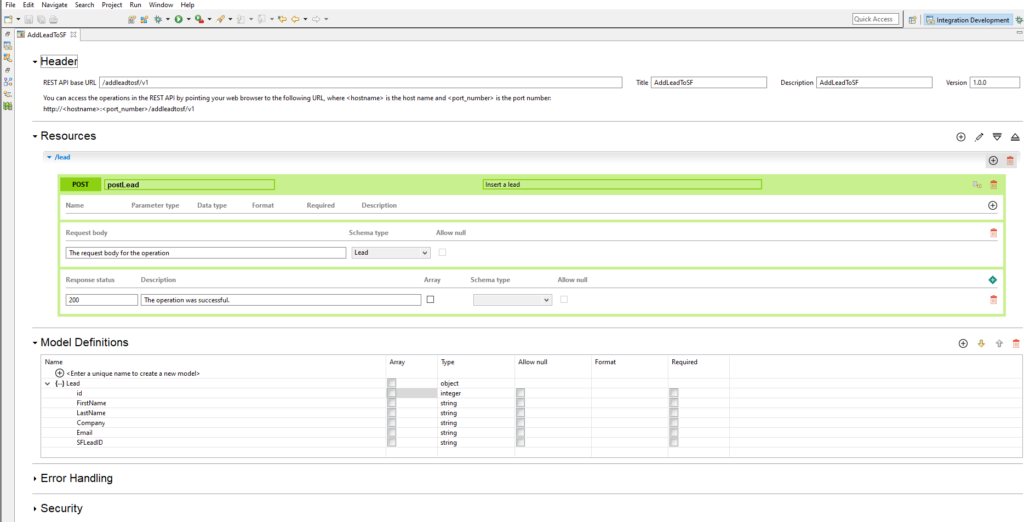
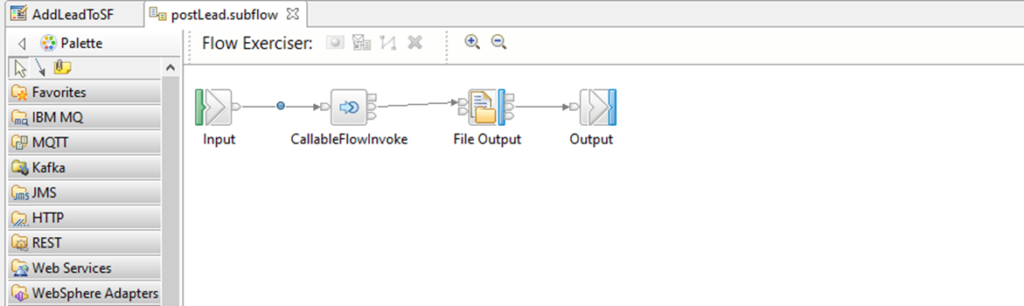
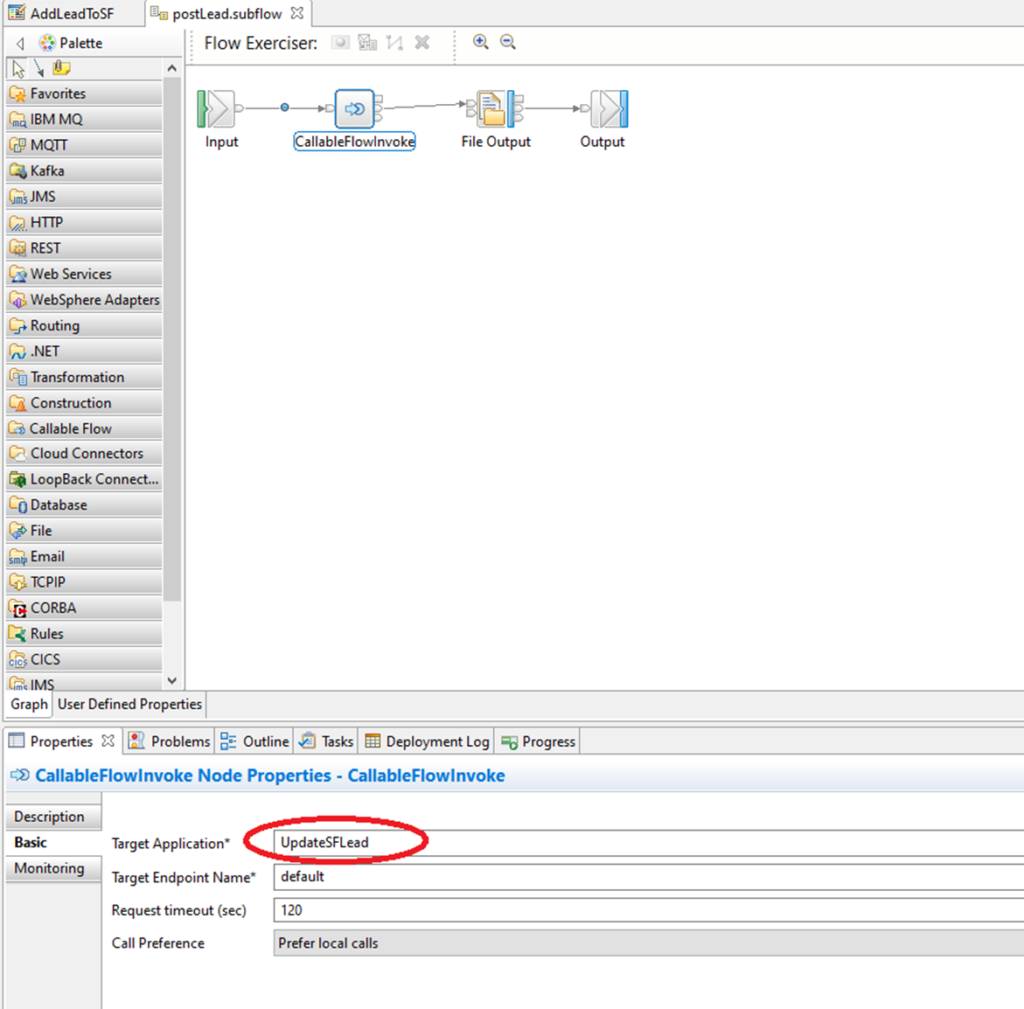
2. The API implementation happens in a sub-flow named postLead.subflow, which invokes the callable flow on App Connect and writes the new lead to a local file:
3. The field name of Target Application in CallableFlowInvoke node should match the name of the flow created by the Designer (Step 3.4):
4. Deploy the REST API to the integration server:

STEP 3. DEVELOP EVENT-DRIVEN (CALLABLE) FLOW IN APP CONNECT DESIGNER
This service is a simple event-driven flow that is triggered when on-premises ACE invokes the callable flow. It updates the lead information in Salesforce and sends out an email.
- Logon to App Connect on cloud and click the Dashboard link, then select New > Event-driven flow.

- Click the Toolbox tab, and then select ‘Callable flow’.
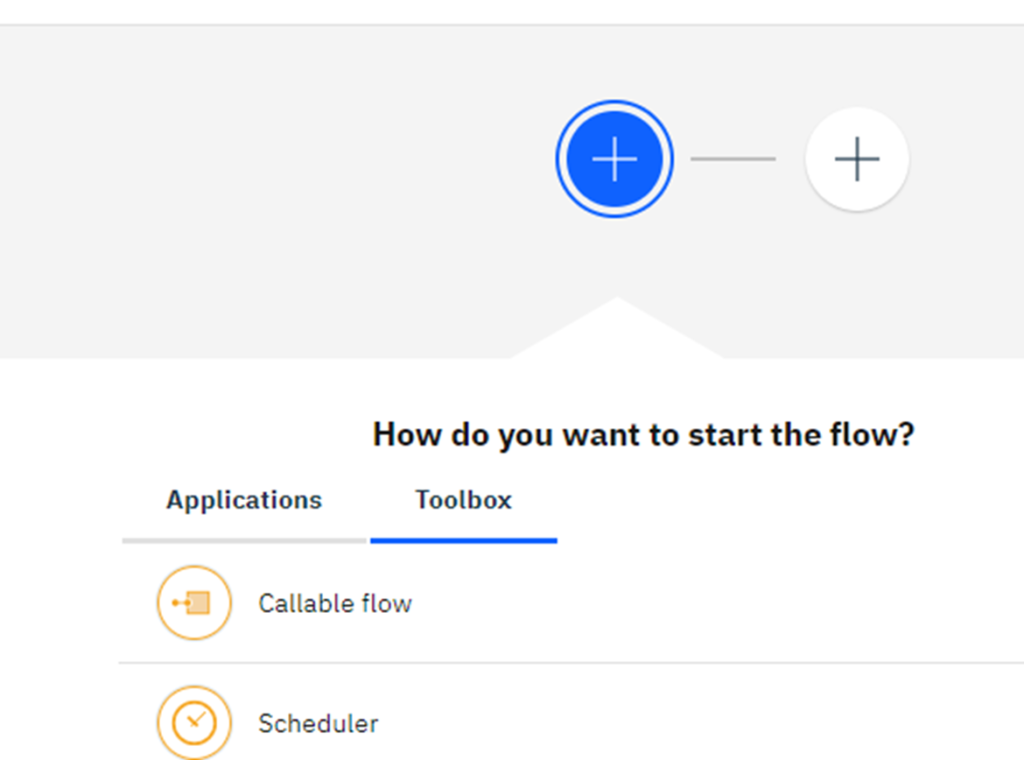
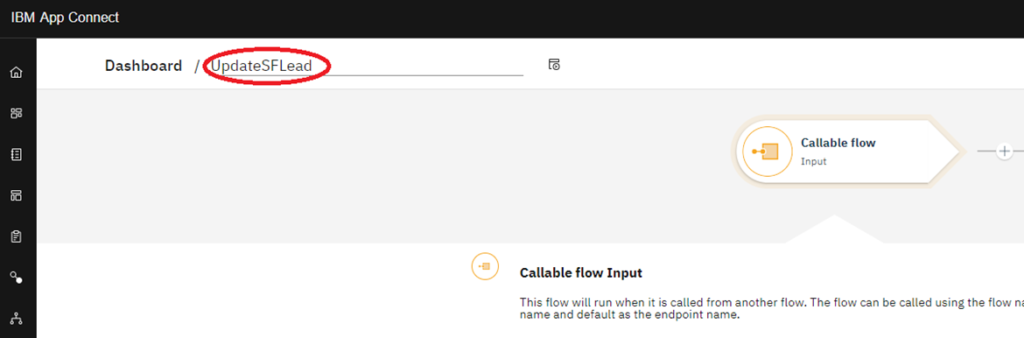
- This will add a ‘Callable flow / Input’ node and a ‘Callable flow / Reply’ node to the flow.
PUT THE IMAGE HERE
- Rename the flow as UpdateSFLead
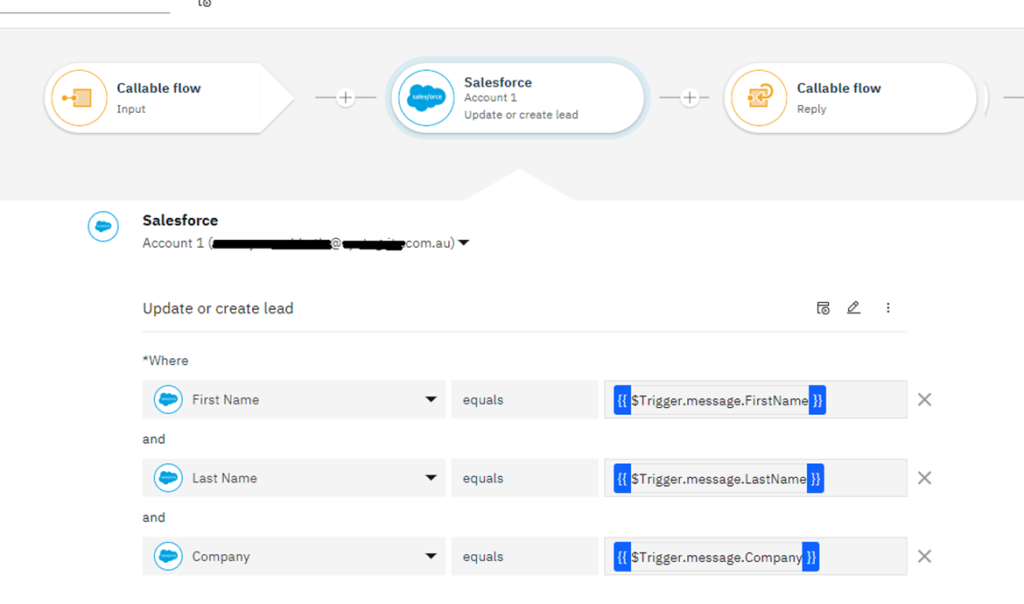
5. Add an action to update or create a Salesforce lead by clicking the plus sign after Callable flow and configure it as described in Scenario 1. Also add where conditions as below:
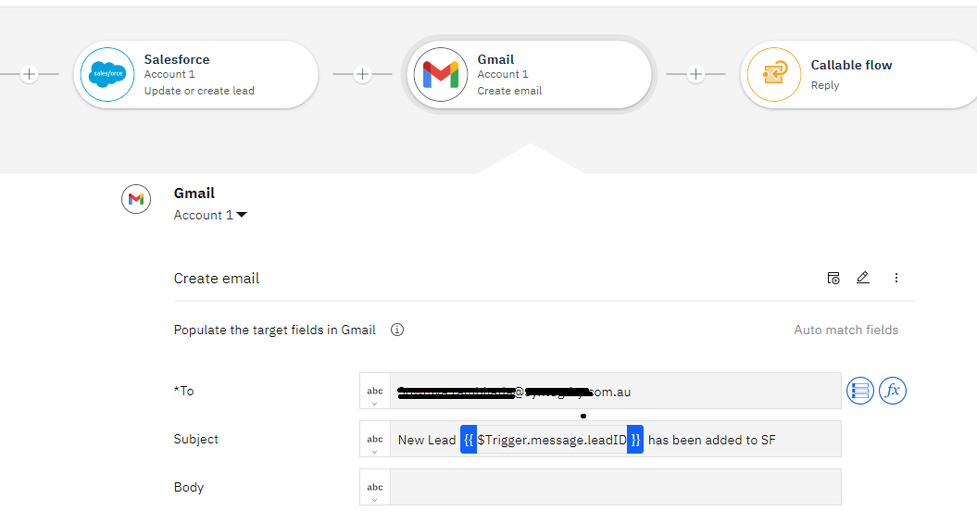
6. Add an action for Gmail to send a message after Salesforce is updated:
STEP 4. START THE FLOW IN APP CONNECT
- Start the flow in App Connect by clicking Start flow.

STEP 5. TEST THE SCENARIO
- Use postman to post a sample lead request to REST API running on the integration server:
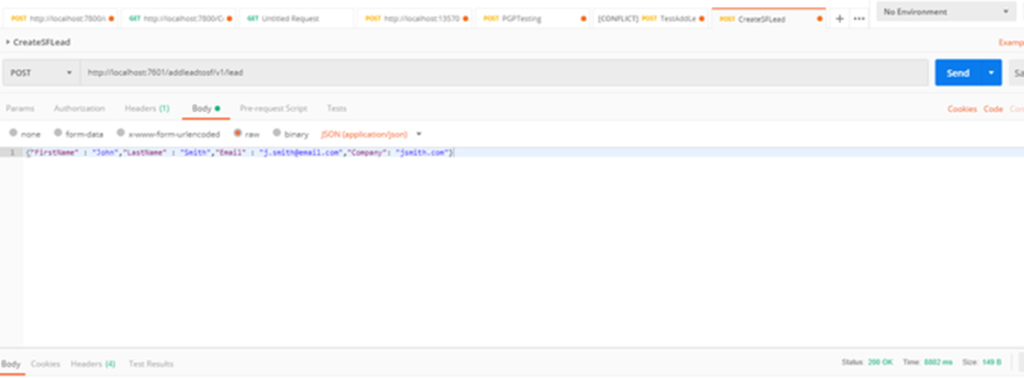
- The above request invokes the REST API service and creates a new lead in Salesforce:

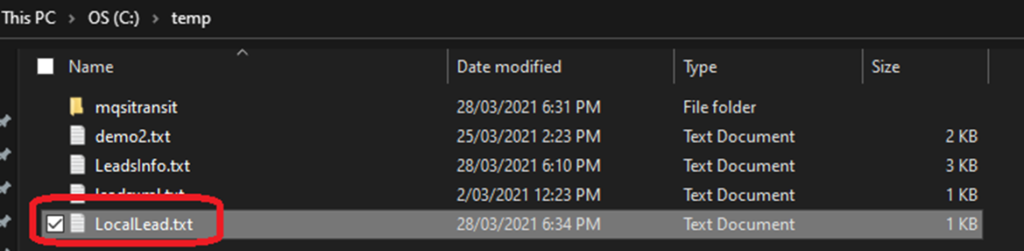
- The same lead is also updated in a local file:
- After the above step, an email is sent out to the configured email id.
CONCLUSION
As organisations embark on the digital transformation and agile integration journeys, demand for business applications integration will undoubtedly grow. The adoption of App Connect Designer by the business users to create simple integrations allowing integration specialists to focus on more complex business application integration requirements.
The hybrid integration using the App Connect Designer and App Connect Enterprise is an easy way to combine on-premises and on-cloud functions for SaaS applications. While the scenarios illustrated above show simple use-cases, the process can be seamlessly extended for complex business solutions.